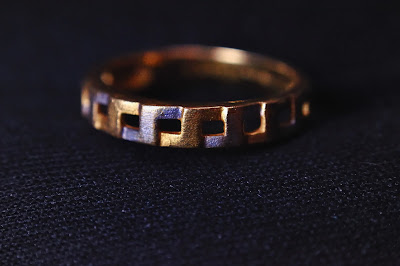
For instance, take a look at this picture

1/400 sec, f/5.6 ISO 1600 (PP'ed in Capture NX2). Subject is a yellow-gold & white-gold ring that I have been wearing. It has a diameter of approximately 20mm.
Look at what people have achieved with this combination.
I had a difficult time figuring out how to make this combination work. The method is documented very clearly on the internet if you look - but it's sometimes hard to understand, so I am documenting it again here for the benefit of folks who land here (of all places).
- Switch off your camera and unmount your existing lens.
- Mount the BR-2A ring as if you're mounting a lens.
- Hold your 50mm f/1.8D lens with the front element facing the camera, take off the front lens cap and screw the lens on to the BR-2A as if you are screwing in a filter to a lens.
- Use the back-element cap as your new lens cap for protection.
- The lens has an aperture ring with an aperture lock switch. If you have been using your 50mm lens as a regular lens, you would have closed down your aperture and locked the aperture using the switch. This enables the camera to control the aperture. Now that doesn't work. So, unlock the aperture ring and turn it wide open.
- Set your camera to manual mode and switch it on. You will see 'F--' on the information panel. That's normal, and that's because your camera can't read the aperture value on the lens. The lens is essentially de-coupled, so none of the automatic controls work - no auto-exposure, no auto-focus, nothing.
- Set your ISO and shutter speed to the desired value. If you don't know what suits, try some combination that you feel comfortable with.
- If you have a D90, your live-view comes in handy. Switch on the live-view now. Use the live-view zoom control to zoom in. This will help you check the focus precisely.
- To focus, move your camera forward / backward till your subject is in focus. The DOF will be narrower than 1mm. So, use a steady hand. If you have a tripod, use it. If the tripod has rails, couldn't ask for more.
- When your subject is in focus, click. Now check the output.
- The picture will end up under-exposed unless you are shooting in bright sun-light. Now, use your creativity to change your shutter-speed, aperture and ISO to obtain a great picture without camera shake, using the right DOF and with minimal noise.
- If you need to use high ISO, don't be afraid to use it. A noisy picture is better than a blurry one. Remember, we now have advanced noise reduction software around to improve noise levels after the fact.


1 comment:
I bought all of the 'pieces' but had trouble finding detailed instructions. Thanks for providing a very clear tutorial. I did spend my Sunday afternoon shooting my first macro photos.
Post a Comment